
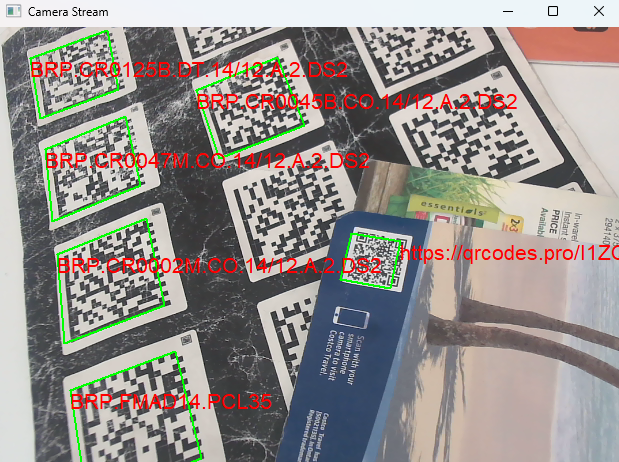
现在,轻量级 c 相机 sdk 已针对 windows、linux 和 macos 完成,我们可以将其集成到其他高级编程语言中。在本文中,我们将探讨如何基于 c 相机库构建 python 相机 sdk,并使用它与 dynamsoft barcode reader sdk 进行多条码扫描。
python 多条码扫描仪演示视频 搭建 cpython 扩展项目的脚手架cpython 扩展是一个共享库(例如,windows 上的 dll、linux 上的 .so 或 macos 上的 .dylib)可以在运行时加载到python解释器中并用于扩展其功能。 lite相机cpython扩展项目的结构如下:
python-lite-camera
│
│── include
│   ├── camera.h
│   ├── camerapreview.h
│   ├── stb_image_write.h
│── lib
│   ├── linux
│   │   ├── liblitecam.so
│   ├── macos
│   │   ├── liblitecam.dylib
│   ├── windows
│   │   ├── litecam.dll
│   │   ├── litecam.lib
├── src
│   ├── litecam.cpp
│   ├── pycamera.h
│   ├── pywindow.h
│── litecam
│   ├── __init__.py
│── setup.py
│── manifest.in
│── readme.md
说明:
- include:c 相机库的头文件。
- lib:c 相机库的共享库。
- src:python相机sdk的源代码。
- litecam:python 扩展的入口点。
- setup.py:构建脚本。
- manifest.in:包含非python文件的清单文件。
- readme.md:文档。
在setup.py中添加以下内容:
from setuptools.command import build_ext
from setuptools import setup, extension
import sys
import os
import io
from setuptools.command.install import install
import shutil
from pathlib import path

lib_dir = ''

sources = [
    "src/litecam.cpp",
]

include_dirs = [os.path.join(os.path.dirname(__file__), "include")]

libraries = ['litecam']

extra_compile_args = []

if sys.platform == "linux" or sys.platform == "linux2":
    lib_dir = 'lib/linux'
    extra_compile_args = ['-std=c++11']
    extra_link_args = ["-wl,-rpath=$origin"]
elif sys.platform == "darwin":
    lib_dir = 'lib/macos'
    extra_compile_args = ['-std=c++11']
    extra_link_args = ["-wl,-rpath,@loader_path"]
elif sys.platform == "win32":
    lib_dir = 'lib/windows'
    extra_link_args = []

else:
    raise runtimeerror("unsupported platform")


long_description = io.open("readme.md", encoding="utf-8").read()

module_litecam = extension(
    "litecam",
    sources=sources,
    include_dirs=include_dirs,
    library_dirs=[lib_dir],
    libraries=libraries,
    extra_compile_args=extra_compile_args,
    extra_link_args=extra_link_args,
)

def copyfiles(src, dst):
    if os.path.isdir(src):
        filelist = os.listdir(src)
        for file in filelist:
            libpath = os.path.join(src, file)
            shutil.copy2(libpath, dst)
    else:
        shutil.copy2(src, dst)


class custombuildext(build_ext.build_ext):
    def run(self):
        build_ext.build_ext.run(self)
        dst = os.path.join(self.build_lib, "litecam")
        copyfiles(lib_dir, dst)
        filelist = os.listdir(self.build_lib)
        for file in filelist:
            filepath = os.path.join(self.build_lib, file)
            if not os.path.isdir(file):
                copyfiles(filepath, dst)
                os.remove(filepath)


class custombuildextdev(build_ext.build_ext):
    def run(self):
        build_ext.build_ext.run(self)
        dev_folder = os.path.join(path(__file__).parent, 'litecam')
        copyfiles(lib_dir, dev_folder)
        filelist = os.listdir(self.build_lib)
        for file in filelist:
            filepath = os.path.join(self.build_lib, file)
            if not os.path.isdir(file):
                copyfiles(filepath, dev_folder)


class custominstall(install):
    def run(self):
        install.run(self)


setup(name='lite-camera',
      version='2.0.1',
      description='litecam is a lightweight, cross-platform library for capturing rgb frames from cameras and displaying them. designed with simplicity and ease of integration in mind, litecam supports windows, linux and macos platforms.',
      long_description=long_description,
      long_description_content_type="text/markdown",
      author='yushulx',
      url='https://github.com/yushulx/python-lite-camera',
      license='mit',
      packages=['litecam'],
      ext_modules=[module_litecam],
      classifiers=[
           "development status :: 5 - production/stable",
           "environment :: console",
           "intended audience :: developers",
          "intended audience :: education",
          "intended audience :: information technology",
          "intended audience :: science/research",
          "license :: osi approved :: mit license",
          "operating system :: microsoft :: windows",
          "operating system :: macos",
          "operating system :: posix :: linux",
          "programming language :: python",
          "programming language :: python :: 3",
          "programming language :: python :: 3 :: only",
          "programming language :: python :: 3.6",
          "programming language :: python :: 3.7",
          "programming language :: python :: 3.8",
          "programming language :: python :: 3.9",
          "programming language :: python :: 3.10",
          "programming language :: python :: 3.11",
          "programming language :: python :: 3.12",
          "programming language :: c++",
          "programming language :: python :: implementation :: cpython",
          "topic :: scientific/engineering",
          "topic :: software development",
      ],
      cmdclass={
          'install': custominstall,
          'build_ext': custombuildext,
          'develop': custombuildextdev},
      )
说明:
- lite-camera:python 包的名称。
- ext_modules:cpython 扩展列表。它指定不同平台的源文件、包含目录、库目录、库以及编译/链接标志。
- 开发:用于开发的自定义命令。它将共享库复制到 litecam 文件夹以方便测试。
- build_ext:自定义构建过程,将共享库打包到wheel包中。
pycamera.h 文件定义了用于从相机捕获帧的 pycamera python 类,而 pywindow.h 文件定义了用于在窗口中显示帧的 pywindow python 类。 litecam.cpp 文件作为 python 扩展的入口点,其中定义了一些全局方法,并注册了 pycamera 和 pywindow 类。
pycamera.h 包括#include <python.h>
#include <structmember.h>
#include "camera.h"
- python.h:包含使用 python c api。
- structmember.h:提供用于管理对象成员的宏和帮助器。
- camera.h:定义 camera 类,pycamera 扩展对其进行包装。
typedef struct
{
    pyobject_head camera *handler;
} pycamera;
pycamera 结构体表示包装 c camera 对象的 python 对象。该处理程序是一个指向 camera 类实例的指针。
方法-
pycamera_dealloc
8556677774455解除分配 camera 对象并释放关联的内存。
-
pycamera_new
static pyobject *pycamera_new(pytypeobject *type, pyobject *args, pyobject *kwds)
{
    pycamera *self;

    self = (pycamera *)type->tp_alloc(type, 0);
    if (self != null)
    {
        self->handler = new camera();
    }

    return (pyobject *)self;
}
创建 pycamera 的新实例。它为python对象分配内存,创建一个新的camera对象,并将其分配给self->handler。
-
开放
static pyobject *open(pyobject *obj, pyobject *args)
{
    pycamera *self = (pycamera *)obj;

    int index = 0;
    if (!pyarg_parsetuple(args, "i", &index))
    {
        return null;
    }

    bool ret = self->handler->open(index);
    return py_buildvalue("i", ret);
}
打开指定索引的相机。
-
列表媒体类型
static pyobject *listmediatypes(pyobject *obj, pyobject *args) { pycamera *self = (pycamera *)obj; std::vector<mediatypeinfo> mediatypes = self->handler->listsupportedmediatypes(); pyobject *pylist = pylist_new(0); for (size_t i = 0; i <p>返回支持的媒体类型列表。对于 windows,它将宽字符串转换为 python unicode 对象。</p> </mediatypeinfo> -
发布
static pyobject *release(pyobject *obj, pyobject *args)
{
    pycamera *self = (pycamera *)obj;

    self->handler->release();
    py_return_none;
}
释放相机。
-
设置分辨率
static pyobject *setresolution(pyobject *obj, pyobject *args)
{
    pycamera *self = (pycamera *)obj;
    int width = 0, height = 0;
    if (!pyarg_parsetuple(args, "ii", &width, &height))
    {
        return null;
    }
    int ret = self->handler->setresolution(width, height);
    return py_buildvalue("i", ret);
}
设置相机的分辨率。
-
捕获帧
static pyobject *captureframe(pyobject *obj, pyobject *args)
{
    pycamera *self = (pycamera *)obj;

    framedata frame = self->handler->captureframe();
    if (frame.rgbdata)
    {
        pyobject *rgbdata = pybytearray_fromstringandsize((const char *)frame.rgbdata, frame.size);
        pyobject *pyframe = py_buildvalue("iiio", frame.width, frame.height, frame.size, rgbdata);
        releaseframe(frame);

        return pyframe;
    }
    else
    {
        py_return_none;
    }
}
从相机捕获帧并将 rgb 数据作为 python 字节数组返回。
-
getwidth 和 getheight
static pyobject *getwidth(pyobject *obj, pyobject *args)
{
    pycamera *self = (pycamera *)obj;

    int width = self->handler->framewidth;
    return py_buildvalue("i", width);
}

static pyobject *getheight(pyobject *obj, pyobject *args)
{
    pycamera *self = (pycamera *)obj;

    int height = self->handler->frameheight;
    return py_buildvalue("i", height);
}
返回捕获帧的宽度和高度。
static pymethoddef instance_methods[] = {
    {"open", open, meth_varargs, null},
    {"listmediatypes", listmediatypes, meth_varargs, null},
    {"release", release, meth_varargs, null},
    {"setresolution", setresolution, meth_varargs, null},
    {"captureframe", captureframe, meth_varargs, null},
    {"getwidth", getwidth, meth_varargs, null},
    {"getheight", getheight, meth_varargs, null},
    {null, null, 0, null}};
定义 pycamera python 对象上可用的方法。这些方法与上面定义的相应 c 函数相关联。
pycamera类型static pytypeobject pycameratype = {
pyvarobject_head_init(null, 0) "litecam.pycamera", /* tp_name */
sizeof(pycamera), /* tp_basicsize */
0, /* tp_itemsize */
(destructor)pycamera_dealloc, /* tp_dealloc */
0, /* tp_print */
0, /* tp_getattr */
0, /* tp_setattr */
0, /* tp_reserved */
0, /* tp_repr */
0, /* tp_as_number */
0, /* tp_as_sequence */
0, /* tp_as_mapping */
0, /* tp_hash */
0, /* tp_call */
0, /* tp_str */
pyobject_genericgetattr, /* tp_getattro */
pyobject_genericsetattr, /* tp_setattro */
0, /* tp_as_buffer */
py_tpflags_default | py_tpflags_basetype, /*tp_flags*/
"pycamera", /* tp_doc */
0, /* tp_traverse */
0, /* tp_clear */
0, /* tp_richcompare */
0, /* tp_weaklistoffset */
0, /* tp_iter */
0, /* tp_iternext */
instance_methods, /* tp_methods */
0, /* tp_members */
0, /* tp_getset */
0, /* tp_base */
0, /* tp_dict */
0, /* tp_descr_get */
0, /* tp_descr_set */
0, /* tp_dictoffset */
0, /* tp_init */
0, /* tp_alloc */
pycamera_new, /* tp_new */
};
定义 pycamera 类型,包括其方法、内存分配、释放和其他行为。
pywindow.h 包括#include <python.h>
#include <structmember.h>
#include "camerapreview.h"
- python.h:使用 python c api 所需的。
- structmember.h:提供管理对象成员的宏。
- camerapreview.h:定义camerawindow类,用于显示相机预览并与其交互。
typedef struct
{
    pyobject_head camerawindow *handler;
} pywindow;
定义一个包装 c camerawindow 对象的 pywindow 结构体。 handler 成员指向 camerawindow 的一个实例。
pywindow 对象的方法-
pywindow_dealloc
static int pywindow_clear(pywindow *self)
{
    if (self->handler)
    {
        delete self->handler;
    }
    return 0;
}

static void pywindow_dealloc(pywindow *self)
{
    pywindow_clear(self);
    py_type(self)->tp_free((pyobject *)self);
}
取消分配camerawindow对象并释放内存。
-
pywindow_new
static pyobject *pywindow_new(pytypeobject *type, pyobject *args, pyobject *kwds)
{
    pywindow *self;

    int width = 0, height = 0;
    char *title = null;

    if (!pyarg_parsetuple(args, "iis", &width, &height, &title))
    {
        return null;
    }

    self = (pywindow *)type->tp_alloc(type, 0);
    if (self != null)
    {
        self->handler = new camerawindow(width, height, title);

        if (!self->handler->create())
        {
            std::cerr handler->show();
    }

    return (pyobject *)self;
}
创建 pywindow 的新实例。它为python对象分配内存,创建一个新的camerawindow对象,并将其分配给self->handler。
-
等待键
static pyobject *waitkey(pyobject *obj, pyobject *args)
{
    pywindow *self = (pywindow *)obj;

    const char *key = null;

    if (!pyarg_parsetuple(args, "s", &key) || strlen(key) != 1)
    {
        pyerr_setstring(pyexc_valueerror, "expected a single character string");
        return null;
    }

    bool ret = self->handler->waitkey(key[0]);
    return py_buildvalue("i", ret);
}
等待按键事件,如果按键与指定字符匹配则返回 false。 false 意味着应用程序应该退出。
-
showframe
static pyobject *showframe(pyobject *obj, pyobject *args)
{
    pywindow *self = (pywindow *)obj;

    int width = 0, height = 0;
    pyobject *bytearray = null;

    if (!pyarg_parsetuple(args, "iio", &width, &height, &bytearray))
    {
        return null;
    }

    unsigned char *data = (unsigned char *)pybytearray_asstring(bytearray);

    self->handler->showframe(data, width, height);

    py_return_none;
}
在窗口中显示一个框架。
-
绘制轮廓
static pyobject *drawcontour(pyobject *obj, pyobject *args) { pywindow *self = (pywindow *)obj; pyobject *pypoints = null; if (!pyarg_parsetuple(args, "o", &pypoints)) { return null; } std::vector<:pair int>> points; for (py_ssize_t i = 0; i handler->drawcontour(points); py_return_none; } </:pair>在框架上绘制轮廓(一系列点)。
-
绘制文本
static pyobject *drawtext(pyobject *obj, pyobject *args)
{
    pywindow *self = (pywindow *)obj;

    const char *text = null;
    int x = 0, y = 0, fontsize = 0;
    pyobject *pycolor = null;

    if (!pyarg_parsetuple(args, "siiio", &text, &x, &y, &fontsize, &pycolor))
    {
        return null;
    }

    camerawindow::color color;
    color.r = (unsigned char)pylong_aslong(pytuple_getitem(pycolor, 0));
    color.g = (unsigned char)pylong_aslong(pytuple_getitem(pycolor, 1));
    color.b = (unsigned char)pylong_aslong(pytuple_getitem(pycolor, 2));

    self->handler->drawtext(text, x, y, fontsize, color);

    py_return_none;
}
在框架上绘制文本。
static pymethoddef window_instance_methods[] = {
    {"waitkey", waitkey, meth_varargs, null},
    {"showframe", showframe, meth_varargs, null},
    {"drawcontour", drawcontour, meth_varargs, null},
    {"drawtext", drawtext, meth_varargs, null},
    {null, null, 0, null}};
定义 pywindow python 对象上可用的方法。
pywindow类型static pytypeobject pywindowtype = {
pyvarobject_head_init(null, 0) "litecam.pywindow", /* tp_name */
sizeof(pywindow), /* tp_basicsize */
0, /* tp_itemsize */
(destructor)pywindow_dealloc, /* tp_dealloc */
0, /* tp_print */
0, /* tp_getattr */
0, /* tp_setattr */
0, /* tp_reserved */
0, /* tp_repr */
0, /* tp_as_number */
0, /* tp_as_sequence */
0, /* tp_as_mapping */
0, /* tp_hash */
0, /* tp_call */
0, /* tp_str */
pyobject_genericgetattr, /* tp_getattro */
pyobject_genericsetattr, /* tp_setattro */
0, /* tp_as_buffer */
py_tpflags_default | py_tpflags_basetype, /*tp_flags*/
"pywindow", /* tp_doc */
0, /* tp_traverse */
0, /* tp_clear */
0, /* tp_richcompare */
0, /* tp_weaklistoffset */
0, /* tp_iter */
0, /* tp_iternext */
window_instance_methods, /* tp_methods */
0, /* tp_members */
0, /* tp_getset */
0, /* tp_base */
0, /* tp_dict */
0, /* tp_descr_get */
0, /* tp_descr_set */
0, /* tp_dictoffset */
0, /* tp_init */
0, /* tp_alloc */
pywindow_new, /* tp_new */
};
定义 pywindow 类型,包括其方法、内存分配、释放和其他行为。
litecam.cpp#include <python.h>
#include <stdio.h>
#include "pycamera.h"
#include "pywindow.h"
#define initerror return null
static pyobject *getdevicelist(pyobject *obj, pyobject *args)
{
pyobject *pylist = pylist_new(0);
std::vector<capturedeviceinfo> devices = listcapturedevices();
for (size_t i = 0; i < devices.size(); i++)
{
capturedeviceinfo &device = devices[i];
#ifdef _win32
pyobject *pyname = pyunicode_fromwidechar(device.friendlyname, wcslen(device.friendlyname));
if (pyname != null)
{
pylist_append(pylist, pyname);
py_decref(pyname);
}
#else
pyobject *pyname = pyunicode_fromstring(device.friendlyname);
if (pyname != null)
{
pylist_append(pylist, pyname);
py_decref(pyname);
}
#endif
}
return pylist;
}
static pyobject *savejpeg(pyobject *obj, pyobject *args)
{
const char *filename = null;
int width = 0, height = 0;
pyobject *bytearray = null;
if (!pyarg_parsetuple(args, "siio", &filename, &width, &height, &bytearray))
{
pyerr_setstring(pyexc_typeerror, "expected arguments: str, int, int, pybytearray");
return null;
}
unsigned char *data = (unsigned char *)pybytearray_asstring(bytearray);
py_ssize_t size = pybytearray_size(bytearray);
if (size != (py_ssize_t)(width * height * 3))
{
pyerr_setstring(pyexc_valueerror, "invalid byte array size for the given width and height.");
return null;
}
saveframeasjpeg(data, width, height, filename);
py_return_none;
}
static pymethoddef litecam_methods[] = {
{"getdevicelist", getdevicelist, meth_varargs, "get available cameras"},
{"savejpeg", savejpeg, meth_varargs, "get available cameras"},
{null, null, 0, null}};
static struct pymoduledef litecam_module_def = {
pymoduledef_head_init,
"litecam",
"internal "litecam" module",
-1,
litecam_methods};
pymodinit_func pyinit_litecam(void)
{
pyobject *module = pymodule_create(&litecam_module_def);
if (module == null)
initerror;
if (pytype_ready(&pycameratype) < 0)
{
printf("failed to initialize pycameratype
");
py_decref(module);
return null;
}
if (pymodule_addobject(module, "pycamera", (pyobject *)&pycameratype) < 0)
{
printf("failed to add pycamera to the module
");
py_decref(&pycameratype);
py_decref(module);
initerror;
}
if (pytype_ready(&pywindowtype) < 0)
{
printf("failed to initialize pywindowtype
");
py_decref(module);
return null;
}
if (pymodule_addobject(module, "pywindow", (pyobject *)&pywindowtype) < 0)
{
printf("failed to add pywindow to the module
");
py_decref(&pywindowtype);
py_decref(module);
initerror;
}
return module;
}
说明:
- getdevicelist:返回可用摄像头的列表。
- savejpeg:将帧保存为 jpeg 图像。
- pyinit_litecam:初始化litecam模块并注册pycamera和pywindow类型。
-
开发模式
python setup.py develop
-
轮组
python setup.py bdist_wheel
-
来源分布
python setup.py sdist
-
安装python相机sdk和dynamsoft barcode reader sdk:
pip install lite-camera dynamsoft-capture-vision-bundle
获取 dynamsoft barcode reader 30 天免费试用许可证。
-
创建用于多条码扫描的 python 脚本:
import litecam
from dynamsoft_capture_vision_bundle import *
import queue

class framefetcher(imagesourceadapter):
    def has_next_image_to_fetch(self) -> bool:
        return true

    def add_frame(self, imagedata):
        self.add_image_to_buffer(imagedata)

class mycapturedresultreceiver(capturedresultreceiver):
    def __init__(self, result_queue):
        super().__init__()
        self.result_queue = result_queue

    def on_captured_result_received(self, captured_result):
        self.result_queue.put(captured_result)

if __name__ == '__main__':
    errorcode, errormsg = licensemanager.init_license(
        "license-key")
    if errorcode != enumerrorcode.ec_ok and errorcode != enumerrorcode.ec_license_cache_used:
        print("license initialization failed: errorcode:",
              errorcode, ", errorstring:", errormsg)
    else:
        camera = litecam.pycamera()
        if camera.open(0):

            cvr = capturevisionrouter()
            fetcher = framefetcher()
            cvr.set_input(fetcher)

            result_queue = queue.queue()

            receiver = mycapturedresultreceiver(result_queue)
            cvr.add_result_receiver(receiver)

            errorcode, errormsg = cvr.start_capturing(
                enumpresettemplate.pt_read_barcodes.value)

            if errorcode != enumerrorcode.ec_ok:
                print("error:", errormsg)

            window = litecam.pywindow(
                camera.getwidth(), camera.getheight(), "camera stream")

            while window.waitkey('q'):
                frame = camera.captureframe()
                if frame is not none:
                    width = frame[0]
                    height = frame[1]
                    size = frame[2]
                    data = frame[3]
                    window.showframe(width, height, data)

                    imagedata = imagedata(
                        bytes(data), width, height, width * 3, enumimagepixelformat.ipf_rgb_888)
                    fetcher.add_frame(imagedata)

                    if not result_queue.empty():
                        captured_result = result_queue.get_nowait()

                        items = captured_result.get_items()
                        for item in items:

                            if item.get_type() == enumcapturedresultitemtype.crit_barcode:
                                text = item.get_text()
                                location = item.get_location()
                                x1 = location.points[0].x
                                y1 = location.points[0].y
                                x2 = location.points[1].x
                                y2 = location.points[1].y
                                x3 = location.points[2].x
                                y3 = location.points[2].y
                                x4 = location.points[3].x
                                y4 = location.points[3].y

                                contour_points = [
                                    (x1, y1), (x2, y2), (x3, y3), (x4, y4)]
                                window.drawcontour(contour_points)

                                window.drawtext(text, x1, y1, 24, (255, 0, 0))

                                del location

            camera.release()

            cvr.stop_capturing()
将 license-key 替换为您的 dynamsoft barcode reader 许可证密钥。
-
运行脚本:
python main.py
https://github.com/yushulx/python-lite-camera
以上就是构建 Python 相机 SDK 并使用它进行多条码扫描的详细内容,更多请关注知识资源分享宝库其它相关文章!
版权声明
本站内容来源于互联网搬运,
仅限用于小范围内传播学习,请在下载后24小时内删除,
如果有侵权内容、不妥之处,请第一时间联系我们删除。敬请谅解!
E-mail:dpw1001@163.com


发表评论